aoi学院

Aisaka's Blog, School of Aoi, Aisaka University

Android-音视频-音频开发-(三)音频编解码

MediaCodec

Android 官方提供的音频编解码的 API,即 MediaCodec 类,该 API 是在 Andorid 4.1 (API 16) 版本引入的,因此只能工作于 Android 4.1 以上的手机上。


MediaCodec 基本介绍

  1. 提供了一套访问 Android 底层多媒体模块的接口,主要是音视频的编解码接口

  2. Android 底层多媒体模块采用的是 OpenMax 框架,任何 Android 底层编解码模块的实现,都必须遵循 OpenMax 标准。(硬件编解码功能,则需要由芯片厂商依照 OpenMax 框架标准来完成,所以,一般采用不同芯片型号的手机,硬件编解码的实现和性能是不同的)

  1. Android 应用层统一由 MediaCodec API 来提供各种音视频编解码功能,由参数配置来决定采用何种编解码算法、是否采用硬件编解码加速等等

MediaCodec生命周期和状态

同步(上)与异步(下)

  • Uninitialized:当通过工厂方法了成功创建编解码器后,此时处于Uninitialized子状态

  • Configured:通过configure方法配置编解码器,此时处于Configured子状态,接着,需要调用start方法来启动,让编解码器进入Executing状态的Flushed子状态,才能输入数据给编解码器处理

  • Flushed:执行start方法后,此时处于Flushed子状态

  • Running:当第一个输入缓冲区被出队,编解码器便进入Running子状态,这意味着大部分时间编解码器都处于此状态

  • End-of-Stream:当给编解码器发送一个带有End-of-Stream标记的Buffer后,编解码器就切换为End-of-Stream子状态,此时,编解码器不再接收输入数据,但仍旧会继续输出,直到end-of-stream标记输出

  • Released:Stopped和Executing都可切换至此状态,当使用编码器操作完成后,应该调用release方法,使编解码器进入此状态

状态切换:

  • **flush()**:Executing → Flushed

  • **stop()**:Executing → Uninitialized,此时可以调用configure方法来重新配置,进入下一轮循环

  • **reset()**:any → Uninitialized,reset可以在任何时候被调用。在某些情况下,编解码器会出现异常,此时应该使用reset而不是stop方法

  • **release()**:不准备重新使用编解码器,那应该调用release进行释放


MediaCodec API 说明

getInputBuffers():获取需要编码数据的输入流队列,返回的是一个ByteBuffer数组

queueInputBuffer():输入流入队列

dequeueInputBuffer():从输入流队列中取数据进行编码操作

getOutputBuffers():获取编解码之后的数据输出流队列,返回的是一个ByteBuffer数组

dequeueOutputBuffer():从输出队列中取出编码操作之后的数据

releaseOutputBuffer():处理完成,释放ByteBuffer数据


MediaCodec 核心原理

1
2
3
4
5
6
7
8
9
10
11
- createEncoderByType/createDecoderByType
- configure
- start
- while(1) {
- dequeueInputBuffer
- queueInputBuffer
- dequeueOutputBuffer
- releaseOutputBuffer
}
- stop
- release

Buffer 队列的操作是其最核心的部分之一,关于 MediaCodec 的 Buffer 队列 ,示意图如下:

MediaCodec 架构上采用了2个缓冲区队列,异步处理数据:

  1. Client 从 input 缓冲区队列申请 empty buffer [dequeueInputBuffer]

  2. Client 把需要编解码的数据拷贝到 empty buffer,然后放入 input 缓冲区队列 [queueInputBuffer]

  3. MediaCodec 模块从 input 缓冲区队列取一帧数据进行编解码处理

  4. 编解码处理结束后,MediaCodec 将原始数据 buffer 置为 empty 后放回 input 缓冲区队列,将编解码后的数据放入到 output 缓冲区队列

  5. Client 从 output 缓冲区队列申请编解码后的 buffer [dequeueOutputBuffer]

  6. Client 对编解码后的 buffer 进行渲染/播放

  7. 渲染/播放完成后,Client 再将该 buffer 放回 output 缓冲区队列 [releaseOutputBuffer]

MediaCodec 在架构上,其实是采用了一种基于“环形缓冲区”的“生产者-消费者”模式,它设计了 2 个基于 idx 序号的“环形缓冲区”:


MediaCodec编码例子(同步)

使用AudioRecord录制音频,MediaCodec编码为AAC

过程步骤:(基于(二)的doStart()中while循环取得的元数据)

AudioRecorder 基本使用方法

1
2
3
4
1. 在 Recorder Thread 中创建 Recorder 与相关的 Encoder
2. loop 读取 Recorder 里面的 PCM data,不断地将 PCM 喂入 Encoder中
3. 外部停止录音后,将 run 这个 flag 置为 false 跳出循环,并且 close 相关 Encoder 并且保存他们的结果。
4. release 相关资源。

创建一个新的MediaCodec对象然后调用configure()方法对MediaCodec进行配置

1
2
3
4
5
6
7
8
9
10
11
mMediaEncoder = MediaCodec.createEncoderByType("audio/mp4a-latm");

MediaFormat mediaFormat = new MediaFormat();
mediaFormat.setString(MediaFormat.KEY_MIME, "audio/mp4a-latm");
mediaFormat.setInteger(MediaFormat.KEY_AAC_PROFILE, MediaCodecInfo.CodecProfileLevel.AACObjectLC);
mediaFormat.setInteger(MediaFormat.KEY_BIT_RATE, 128000);
mediaFormat.setInteger(MediaFormat.KEY_CHANNEL_COUNT, 1);
mediaFormat.setInteger(MediaFormat.KEY_MAX_INPUT_SIZE, 1024 * 1024);
mediaFormat.setInteger(MediaFormat.KEY_SAMPLE_RATE, 44100);
// 第四个参数 编码的时候是MediaCodec.CONFIGURE_FLAG_ENCODE 解码的时候是0
mMediaEncoder.configure(mediaFormat, null, null, MediaCodec.CONFIGURE_FLAG_ENCODE);

调用MediaCodec的start()方法,此时MediaCodec处于Executing状态,可以通过getInputBuffers()方法和getOutputBuffers()方法获取缓存队列

1
2
3
4
5
6
// start()后进入执行状态,才能做后续的操作
mMediaEncoder.start();
// 获取输入缓存,输出缓存
mAudioInputBuffers = mMediaEncoder.getInputBuffers();
mAudioOutputBuffers = mMediaEncoder.getOutputBuffers();
// getInput/OutputBuffers()已经被废弃,应通过dequeueOutputBuffer()获取id然后使用getInput/OutputBuffer(int)来获取缓冲区。(见下文官方例子)

返回的整型变量为请求到的输入缓存的index,通过getInputBuffers()得到的是输入缓存数组,通过index和输入缓存数组可以得到当前请求的输入缓存,在使用之前要clear一下,避免之前的缓存数据影响当前数据

1
2
3
4
5
6
// dequeueInputBuffer(time)需要传入一个时间值,-1表示一直等待,0表示不等待有可能会丢帧,其他表示等待多少毫秒
int inputIndex = mMediaEncoder.dequeueInputBuffer(-1);
...
// 获取输入缓存的index
ByteBuffer inputByteBuf = mAudioInputBuffers[inputIndex];
inputByteBuf.clear();

把数据添加到输入缓存中,并调用queueInputBuffer()把缓存数据入队

1
2
3
4
5
6
7
8
9
10
11
12
13
14
15
16
// 添加数据
inputByteBuf.put(data);
// 限制ByteBuffer的访问长度
inputByteBuf.limit(data.length);
// 把输入缓存塞回去给MediaCodec
mMediaEncoder.queueInputBuffer(inputIndex, 0, data.length, 0, 0);

// mAudioEncoder.queueInputBuffer(inputBufIndex, 0, data.length, (1000000 * mEncodedSize / AUDIO_BYTE_PER_SAMPLE), 0);
// 有些设备不设置好presentationTimeUs会丢帧
// 这里的1000000是把秒变成微秒,音频输出的时间戳是微秒,输出到surface的视频是纳秒,源码中是这么说的:
// * @param presentationTimeUs The presentation timestamp in microseconds for this
// * buffer. This is normally the media time at which this
// * buffer should be presented (rendered). When using an output
// * surface, this will be propagated as the {@link
// * SurfaceTexture#getTimestamp timestamp} for the frame (after
// * conversion to nanoseconds).

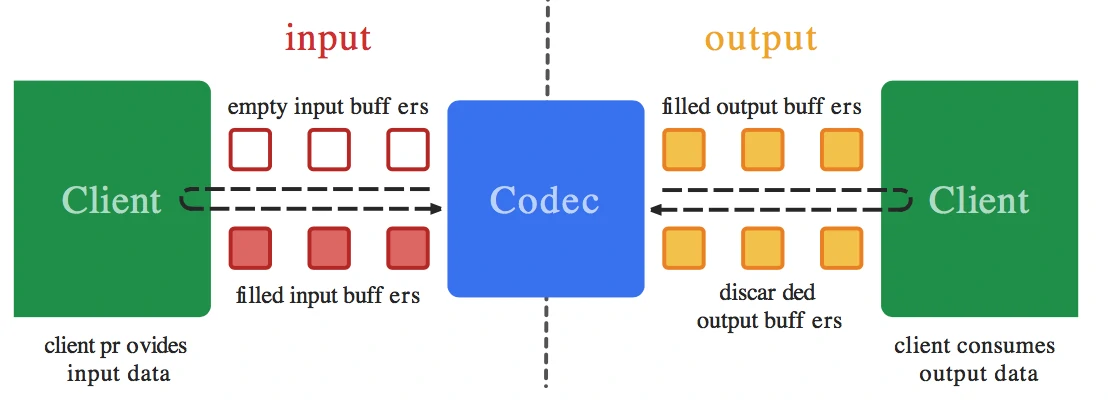
获取输出缓存和获取输入缓存类似,首先通过dequeueOutputBuffer(BufferInfo info, long timeoutUs)来请求一个输出缓存,这里需要传入一个BufferInfo对象,用于存储ByteBuffer的信息
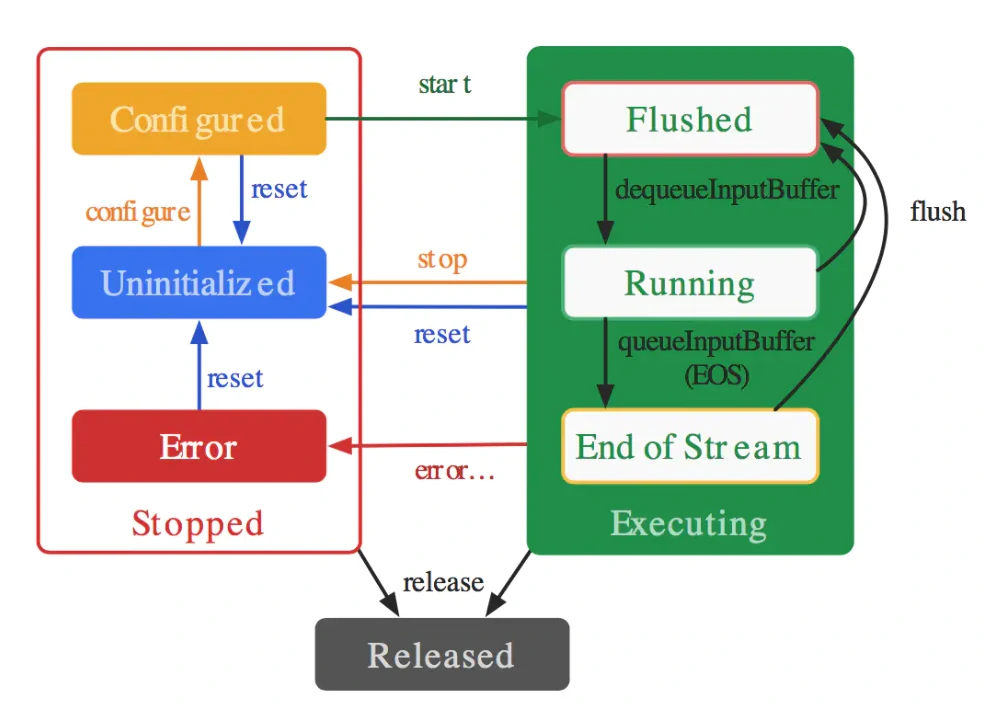
1
2
// 获取输出缓存的index
int outputIndex = mMediaEncoder.dequeueOutputBuffer(mBufferInfo, 0);

通过返回的index得到输出缓存,并通过BufferInfo获取ByteBuffer的信息,注意一定要调用releaseOutputBuffer方法

1
2
3
4
5
6
7
8
9
10
11
12
// 获取输出缓存的index
int outputIndex = mMediaEncoder.dequeueOutputBuffer(mBufferInfo, 0);
while (outputIndex >= 0) {
// 获取缓存信息的长度
int byteBufSize = mBufferInfo.size;
...
// 处理数据
...
//释放
mMediaEncoder.releaseOutputBuffer(outputIndex, false);
outputIndex = mMediaEncoder.dequeueOutputBuffer(mBufferInfo, 0);
}

使用完MediaCodec后释放资源

1
2
mAudioEncoder.stop();
mAudioEncoder.release();

上述过程的总结代码如下:PCM数据编码为AAC数据

1
2
3
4
5
6
7
8
9
10
11
12
13
14
15
16
17
18
19
20
21
22
23
24
25
26
27
28
29
30
31
32
33
34
35
36
37
38
39
40
41
42
43
44
45
46
47
48
49
50
51
52
53
54
55
56
57
58
59
60
61
62
63
64
65
66
67
68
69
70
71
72
73
74
75
76
77
78
79
80
81
82
83
84
85
86
87
88
89
90
public void init() {
try {
mMediaEncoder = MediaCodec.createEncoderByType("audio/mp4a-latm");

MediaFormat mediaFormat = new MediaFormat();
mediaFormat.setString(MediaFormat.KEY_MIME, "audio/mp4a-latm");
mediaFormat.setInteger(MediaFormat.KEY_AAC_PROFILE, MediaCodecInfo.CodecProfileLevel.AACObjectLC);
mediaFormat.setInteger(MediaFormat.KEY_BIT_RATE, 128000);
mediaFormat.setInteger(MediaFormat.KEY_CHANNEL_COUNT, 1);
mediaFormat.setInteger(MediaFormat.KEY_MAX_INPUT_SIZE, 1024 * 1024);
mediaFormat.setInteger(MediaFormat.KEY_SAMPLE_RATE, 44100);
// 第四个参数 编码的时候是MediaCodec.CONFIGURE_FLAG_ENCODE 解码的时候是0
mMediaEncoder.configure(mediaFormat, null, null, MediaCodec.CONFIGURE_FLAG_ENCODE);
// start()后进入执行状态,才能做后续的操作
mMediaEncoder.start();
// 获取输入缓存,输出缓存
mAudioInputBuffers = mMediaEncoder.getInputBuffers();
mAudioOutputBuffers = mMediaEncoder.getOutputBuffers();
} catch (IOException e) {
e.printStackTrace();
}
}

public byte[] encodeData(byte[] data) {
// dequeueInputBuffer(time)需要传入一个时间值,-1表示一直等待,0表示不等待有可能会丢帧,其他表示等待多少毫秒
int inputIndex = mMediaEncoder.dequeueInputBuffer(-1);
// 获取输入缓存的index
if (inputIndex >= 0) {
ByteBuffer inputByteBuf = mAudioInputBuffers[inputIndex];
inputByteBuf.clear();
// 添加数据
inputByteBuf.put(data);
// 限制ByteBuffer的访问长度
inputByteBuf.limit(data.length);
// 把输入缓存塞回去给MediaCodec
mMediaEncoder.queueInputBuffer(inputIndex, 0, data.length, 0, 0);
}

// 获取输出缓存的index
int outputIndex = mMediaEncoder.dequeueOutputBuffer(mBufferInfo, 0);
while (outputIndex >= 0) {
// 获取缓存信息的长度
int byteBufSize = mBufferInfo.size;
// 添加ADTS头部后的长度
int bytePacketSize = byteBufSize + 7;

ByteBuffer outPutBuf = mAudioOutputBuffers[outputIndex];
outPutBuf.position(mBufferInfo.offset);
outPutBuf.limit(mBufferInfo.offset + mBufferInfo.size);

byte[] targetByte = new byte[bytePacketSize];
//添加ADTS头部
addADTStoPacket(targetByte, bytePacketSize);
/*
get(byte[] dst,int offset,int length):ByteBuffer从position位置开始读,读取length个byte,并写入dst下
标从offset到offset + length的区域
*/
outPutBuf.get(targetByte, 7, byteBufSize);

outPutBuf.position(mBufferInfo.offset);

try {
fileOutputStream.write(targetByte);
} catch (IOException e) {
e.printStackTrace();
}
//释放
mMediaEncoder.releaseOutputBuffer(outputIndex, false);
outputIndex = mMediaEncoder.dequeueOutputBuffer(mBufferInfo, 0);
}
return data;
}

/**
* 给编码出的aac裸流添加adts头字段
* @param packet 要空出前7个字节,否则会搞乱数据
* @param packetLen
*/
private void addADTStoPacket(byte[] packet, int packetLen) {
int profile = 2; // AAC LC
int freqIdx = 4; // 44.1KHz
int chanCfg = 1; // SCE
packet[0] = (byte) 0xFF;
packet[1] = (byte) 0xF9;
packet[2] = (byte) (((profile - 1) << 6) + (freqIdx << 2) + (chanCfg >> 2));
packet[3] = (byte) (((chanCfg & 3) << 6) + (packetLen >> 11));
packet[4] = (byte) ((packetLen & 0x7FF) >> 3);
packet[5] = (byte) (((packetLen & 7) << 5) + 0x1F);
packet[6] = (byte) 0xFC;
}

附带贴上一段官方提供的代码思路(学习思路):官方给出的一段同步典型代码

1
2
3
4
5
6
7
8
9
10
11
12
13
14
15
16
17
18
19
20
21
22
23
24
25
26
27
28
MediaCodec codec = MediaCodec.createByCodecName(name);
codec.configure(format, …);
MediaFormat outputFormat = codec.getOutputFormat(); // option B
codec.start();
for (;;) {
int inputBufferId = codec.dequeueInputBuffer(timeoutUs);
if (inputBufferId >= 0) {
ByteBuffer inputBuffer = codec.getInputBuffer(…);
// fill inputBuffer with valid data

codec.queueInputBuffer(inputBufferId, …);
}
int outputBufferId = codec.dequeueOutputBuffer(…);
if (outputBufferId >= 0) {
ByteBuffer outputBuffer = codec.getOutputBuffer(outputBufferId);
MediaFormat bufferFormat = codec.getOutputFormat(outputBufferId); // option A
// bufferFormat is identical to outputFormat
// outputBuffer is ready to be processed or rendered.

codec.releaseOutputBuffer(outputBufferId, …);
} else if (outputBufferId == MediaCodec.INFO_OUTPUT_FORMAT_CHANGED) {
// Subsequent data will conform to new format.
// Can ignore if using getOutputFormat(outputBufferId)
outputFormat = codec.getOutputFormat(); // option B
}
}
codec.stop();
codec.release();

MediaCodec编码例子(异步)

使用AudioRecord录制音频,MediaCodec编码为AAC

设置回调方法必须在MediaCodec创建之后,并且在configure方法之前。

其中index是指向缓冲区的BufferId,利用这个index用户可以获得缓冲区;format是变化后的Mediaformat。

1
2
3
4
5
6
7
8
9
10
11
// 当inputbuffer可用时回调此方法
void onInputBufferAvailable(MediaCodec codec, int index)

// 当outputbuffer可用时回调此方法
void onOutputBufferAvailable(MediaCodec codec, int index, MediaCodec.BufferInfo info)

// 当输出格式变化时回调此方法
void onOutputFormatChanged(MediaCodec codec, MediaFormat format)

// 发生错误时回调此方法
void onError(MediaCodec codec, MediaCodec.CodecException e)

基于同步的方法做对应修改,如下给出官方示例:官方给出的一段异步典型代码

1
2
3
4
5
6
7
8
9
10
11
12
13
14
15
16
17
18
19
20
21
22
23
24
25
26
27
28
29
30
31
32
33
34
35
36
37
38
39
MediaCodec codec = MediaCodec.createByCodecName(name);
MediaFormat mOutputFormat; // member variable
codec.setCallback(new MediaCodec.Callback() {
@Override
void onInputBufferAvailable(MediaCodec mc, int inputBufferId) {
ByteBuffer inputBuffer = codec.getInputBuffer(inputBufferId);
// fill inputBuffer with valid data

codec.queueInputBuffer(inputBufferId, …);
}

@Override
void onOutputBufferAvailable(MediaCodec mc, int outputBufferId, …) {
ByteBuffer outputBuffer = codec.getOutputBuffer(outputBufferId);
MediaFormat bufferFormat = codec.getOutputFormat(outputBufferId); // option A
// bufferFormat is equivalent to mOutputFormat
// outputBuffer is ready to be processed or rendered.

codec.releaseOutputBuffer(outputBufferId, …);
}

@Override
void onOutputFormatChanged(MediaCodec mc, MediaFormat format) {
// Subsequent data will conform to new format.
// Can ignore if using getOutputFormat(outputBufferId)
mOutputFormat = format; // option B
}

@Override
void onError(…) {

}
});
codec.configure(format, …);
mOutputFormat = codec.getOutputFormat(); // option B
codec.start();
// wait for processing to complete
codec.stop();
codec.release();

MediaCodec解码例子

硬解码AAC音频文件并播放

初始化结束后,调用play()传入音频文件即可

配置播放器initAudioTrack()

1
2
3
4
5
6
7
8
9
10
11
private void initAudioTrack() {
// 配置播放器
int streamType = AudioManager.STREAM_MUSIC;
int sampleRate = 44100;
int channelConfig = AudioFormat.CHANNEL_OUT_MONO;
int audioFormat = AudioFormat.ENCODING_PCM_16BIT;
int mode = AudioTrack.MODE_STREAM;
int minBufferSize = AudioTrack.getMinBufferSize(sampleRate, channelConfig, audioFormat);
mAudioTrack = new AudioTrack(streamType, sampleRate, channelConfig, audioFormat,
Math.max(minBufferSize, 2048), mode);
}

配置解码器initDecoder()

1
2
3
4
5
6
7
8
9
10
11
12
13
14
15
16
17
18
19
20
21
22
23
24
25
26
27
28
29
30
31
32
33
34
35
private void initDecoder() {
try {
// 需要解码数据的类型
String mine = "audio/mp4a-latm";
// 初始化解码器
mDecoder = MediaCodec.createDecoderByType(mine);
// MediaFormat用于描述音视频数据的相关参数
MediaFormat mediaFormat = new MediaFormat();
// 数据类型
mediaFormat.setString(MediaFormat.KEY_MIME, mine);
// 声道个数
mediaFormat.setInteger(MediaFormat.KEY_CHANNEL_COUNT, 2);
// 采样率
mediaFormat.setInteger(MediaFormat.KEY_SAMPLE_RATE, 48000);
// 比特率
mediaFormat.setInteger(MediaFormat.KEY_BIT_RATE, 128000);
// 用来标记AAC是否有adts头,1->有
mediaFormat.setInteger(MediaFormat.KEY_IS_ADTS, 1);
// 用来标记aac的类型
mediaFormat.setInteger(MediaFormat.KEY_AAC_PROFILE, MediaCodecInfo.CodecProfileLevel.AACObjectLC);
byte[] data = new byte[]{(byte) 0x11, (byte) 0x90};
ByteBuffer csd_0 = ByteBuffer.wrap(data);
mediaFormat.setByteBuffer("csd-0", csd_0);
// 解码器配置
mDecoder.configure(mediaFormat, null, null, 0);

mDecoder.start();
// 输入ByteBuffer
mCodecInputBuffers = mDecoder.getInputBuffers();
// 输出ByteBuffer
mCodecOutputBuffers = mDecoder.getOutputBuffers();
} catch (IOException e) {
e.printStackTrace();
}
}

传入文件即可播放aac音频play()

1
2
3
4
5
6
7
8
9
10
11
12
13
14
15
16
17
18
19
20
21
22
23
24
25
26
27
28
29
30
31
32
33
34
35
36
37
38
39
40
41
42
43
44
45
46
47
48
49
50
51
52
53
54
55
56
57
58
59
60
61
62
63
public void play(File audioRecordFile) {
// 这个值用于找到第一个帧头后,继续寻找第二个帧头,如果解码失败可以尝试缩小这个值
int FRAME_MIN_LEN = 50;
// 一般AAC帧大小不超过200k,如果解码失败可以尝试增大这个值
int FRAME_MAX_LEN = 100 * 1024;
// 从文件流读数据
FileInputStream fis = null;
byte[] mBuffer = new byte[2048];
try {
// 循环读数据,写到播放器去播放
fis = new FileInputStream(audioRecordFile);
Log.d(TAG, audioRecordFile.toString());
// 保存完整数据帧
byte[] frame = new byte[FRAME_MAX_LEN];
// 当前帧长度
int frameLen = 0;
// 每次从文件读取的数据
byte[] readData = new byte[10 * 1024];
// 循环读数据,写到播放器去播放 只要没读完,循环播放
mAudioTrack.play();
int readLen;
while ((readLen = fis.read(mBuffer)) != -1) {
// 当前长度小于最大值
if (frameLen + readLen < FRAME_MAX_LEN) {
// 将readData拷贝到frame
System.arraycopy(readData, 0, frame, frameLen, readLen);
// 修改frameLen
frameLen += readLen;
// 寻找第一个帧头
int headFirstIndex = findHead(frame, 0, frameLen);
while (headFirstIndex >= 0 && isHead(frame, headFirstIndex)) {
// 寻找第二个帧头
int headSecondIndex = findHead(frame, headFirstIndex + FRAME_MIN_LEN, frameLen);
// 如果第二个帧头存在,则两个帧头之间的就是一帧完整的数据
if (headSecondIndex > 0 && isHead(frame, headSecondIndex)) {
// 视频解码
decodeData(frame, headFirstIndex, headSecondIndex - headFirstIndex);
// 截取headSecondIndex之后到frame的有效数据,并放到frame最前面
byte[] temp = Arrays.copyOfRange(frame, headSecondIndex, frameLen);
System.arraycopy(temp, 0, frame, 0, temp.length);
// 修改frameLen的值
frameLen = temp.length;
// 继续寻找数据帧
headFirstIndex = findHead(frame, 0, frameLen);
} else {
// 找不到第二个帧头
headFirstIndex = -1;
}
}
} else {
//如果长度超过最大值,frameLen置0
frameLen = 0;
}
}
Log.d(TAG, "播放完毕!");
} catch (Exception e) {
e.printStackTrace();
} finally {
closeInputStream(fis);
// 播放器释放
resetQuietly(mAudioTrack);
}
}

play()中的aac解码+播放函数decodeData()

1
2
3
4
5
6
7
8
9
10
11
12
13
14
15
16
17
18
19
20
21
22
23
24
25
26
27
28
29
30
31
32
33
34
35
/**
* aac解码+播放
*/
private void decodeData(byte[] data, int offset, int length) {
int inputIndex = mDecoder.dequeueInputBuffer(-1);
if (inputIndex >= 0) {
// 获取当前的ByteBuffer
ByteBuffer inputByteBuf = mCodecInputBuffers[inputIndex];
// 清空ByteBuffer
inputByteBuf.clear();
// 填充数据
inputByteBuf.put(data, offset, length);
// 将指定index的input buffer提交给解码器
mDecoder.queueInputBuffer(inputIndex, 0, length, 0, 0);
}
// 编解码器缓冲区
MediaCodec.BufferInfo info = new MediaCodec.BufferInfo();
int outputBufferIndex = mDecoder.dequeueOutputBuffer(info, -1);
ByteBuffer outputBuffer;
while (outputBufferIndex >= 0) {
// 获取解码后的ByteBuffer
outputBuffer = mCodecOutputBuffers[outputBufferIndex];
// 用来保存解码后的数据
byte[] outData = new byte[info.size];
outputBuffer.get(outData);
// 清空缓存
outputBuffer.clear();
// 播放解码后的数据
mAudioTrack.write(outData, 0, info.size);
// 释放已经解码的buffer
mDecoder.releaseOutputBuffer(outputBufferIndex, false);
// 解码未解完的数据
outputBufferIndex = mDecoder.dequeueOutputBuffer(info, -1);
}
}

play()中的找缓存中aac帧头起始位置findHead()

1
2
3
4
5
6
7
8
9
10
11
12
13
14
15
16
17
18
19
20
21
/**
* 寻找指定buffer中AAC帧头的开始位置
*
* @param startIndex 开始的位置
* @param data 数据
* @param max 需要检测的最大值
* @return
*/
private int findHead(byte[] data, int startIndex, int max) {
int i;
for (i = startIndex; i <= max; i++) {
// 发现帧头
if (isHead(data, i))
break;
}
// 检测到最大值,未发现帧头
if (i == max) {
i = -1;
}
return i;
}

play()中的判断aac帧头方法isHead()

1
2
3
4
5
6
7
8
9
10
11
/**
* 判断aac帧头
*/
private boolean isHead(byte[] data, int offset) {
boolean result = false;
if (data[offset] == (byte) 0xFF && data[offset + 1] == (byte) 0xF1
&& data[offset + 3] == (byte) 0x80) {
result = true;
}
return result;
}